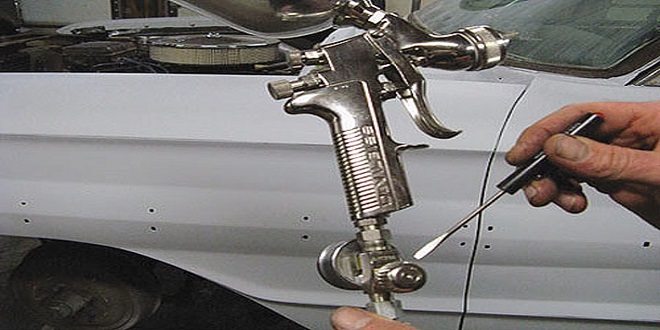
This painter is using a pressure-pot system. Pressure pots are great for really large projects but are usually overkill in automotive projects, even a full-size car such as this 1964 Ford Galaxie. The long hoses can be a challenge to clean but are worth it on large jobs. Story and photos by Tim Garrett aint is probably the first features people immediately notice on a vintage vehicle. In order to get the best paint results, it is necessary to have the right tools for the job. There are a number of paint spray gun types on the market and in this article, we’ll describe the styles and their uses to the hobbyist.
One of the things to take into account when selecting a paint gun is the type of material that will be going through it. It’s important to have separate guns for primers and colors. Primer is thicker than paint and requires a larger tip size to get the proper film build. Regular build primer generally sprays well through a tip size.
Siphon feed guns
The most common siphon-feed gun is the legendary Binks design. This gun has been copied endlessly and import versions are available everywhere from Harbor Freight to Walmart. The only thing to keep in mind with the economy-grade copies is that the cheapest versions are almost always “one-use wonders,” at best. It is hard to purchase a decent siphon-feed gun for less than $40. Siphon-feed guns use additional air pressure to pull the paint up from a siphon tube in the cup below the gun.
This means there is more over-spray with a siphon-feed gun than with an HVLP, and therefore more wasted material. It is also hard to use up the last of the material that is in the cup another disadvantage to the siphon feed. Paint often sloshes away from the siphon tube, which causes spitting and sputtering. Top-feed guns don’t have this problem, because the paint falls from the cup into the spray chamber via gravity.
Pressure-pot guns
Pressure-pot guns are built similar to siphon gun heads but have hoses leading to a large-capacity pot that sits on the ground. These systems are most commonly used when painting very large projects that require a lot of paint to be mixed at once. Since most hobbyists won’t ever need this feature, there’s little reason to go with a pressure-pot design.
It makes more sense to mix paint in a 5-quart mixing cup and refill a regular-size gun more often than it takes to go through the extra effort of cleaning the pressure pot and lines in addition to cleaning the paint gun itself. Even cheap pressure pots aren’t cheap, so unless the project in question is a Peterbilt with a matching trailer, it’s best to stay with the more traditional top-or bottom-feed designs.
Setting up the gun
Once the style of gun is selected and the type of product to be sprayed is selected, it’s time to actually set up the gun. The settings for most paint guns are pretty close to the factory, and seldom are the adjustments set all the way to one extreme or the other. The paint gun will come with instructions, but there’s trial and error involved in adjusting the gun as well. Testing and practice are both important when setting up a gun
Paint gun accessories
Paint gun accessories should also be considered upon purchase. A good water trap is very important. There should be a trap on the compressor, but there should also be a trap on the gun itself. This allows condensation in the airline to be kept out of the paint gun.
Nothing fouls up a great spray pattern as much as water droplets! There are two common filter types that attach to the paint gun. The less expensive is the ball style, which works great. The more expensive is a desiccant style, which has the added advantage of allowing the painter to see when it is about to fill with moisture. Both of these attach to the paint gun right where the air hose enters.
Some of the most common groups include mammals, birds, reptiles, amphibians, and fish. Each group has its unique set of features and adaptations that allow them to survive in their respective environments. Animals play a crucial role in maintaining the balance of nature and provide numerous benefits to humans, including food, clothing, and companionship. However, many species are threatened due to human activities such as habitat destruction, pollution, and poaching.